Learning how to speed up your website is one of the most crucial things you can do. Fast-loading pages are incredibly important for website success as they influence so many factors. Just one or two seconds in delay can reduce:
- Page views
- Customer satisfaction
- Conversions
- User experience
- Search ranking
- Profits
- And more…
Don’t believe it? You will find the proof below together with a huge list of things you can do to speed up your website.
How Lack of Speed Kills Your Site
Before going over the how-to part, let’s talk about what’s so bad about a site that’s more on the sluggish site. After all, what’s a few more seconds? Don’t people have time anymore? Turns out they really don’t.
1. Increases Bounce Rate
A slow-loading website pushes people to abandon it. Especially on mobile, the slower your site, the more likely it is that visitors will bounce according to a Google study.
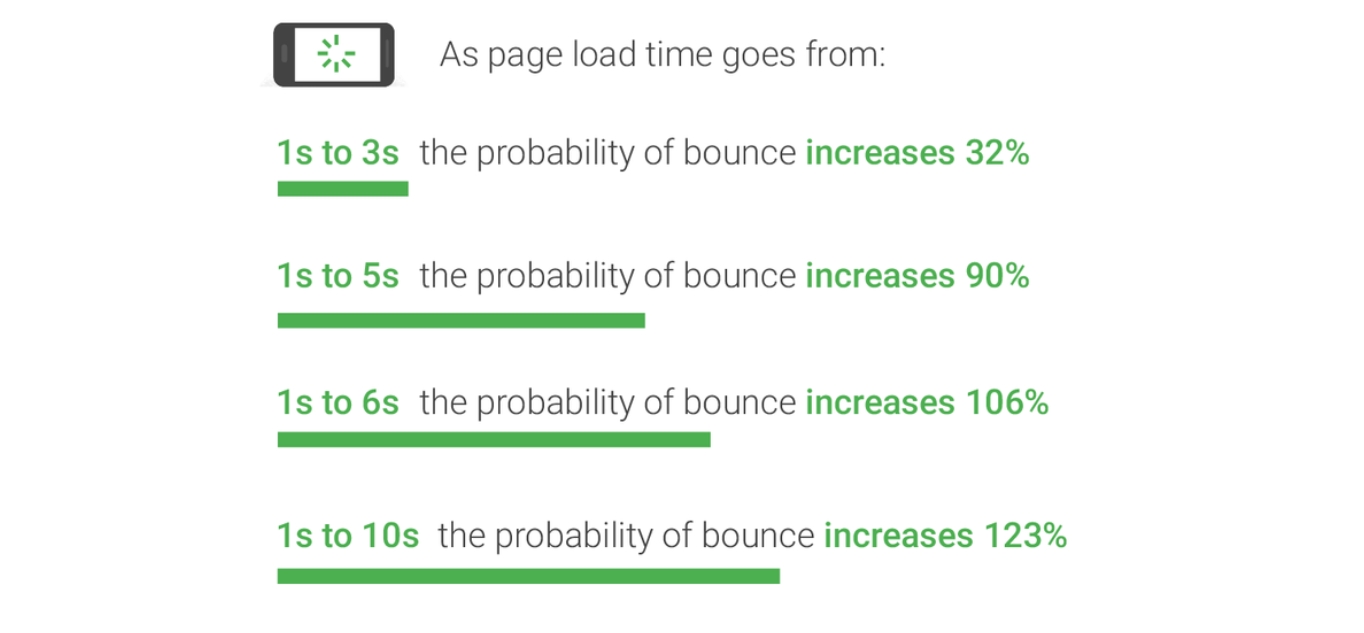
As you can see, just two seconds can make a big difference and only four seconds can increase bounce rates by 100%. Conclusion: if you want visitors to stick around, make your site fast.
2. Reduces Conversions (Less Money)
In addition to the above, speeding up your website also has an effect on conversions. For example, Portent found that when e-commerce sites go from two to one second page loading time, they can double their revenue.
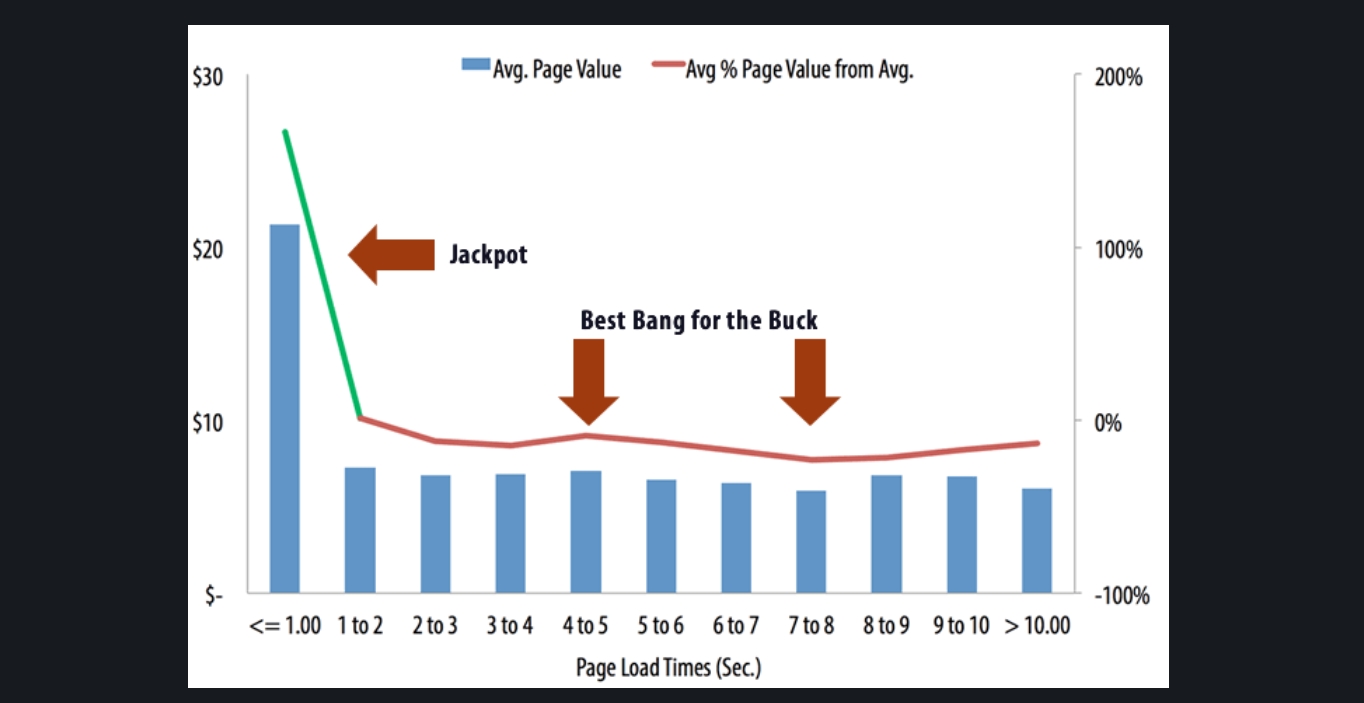
That’s huge! Similarly, Walmart learned that the faster their pages, the more likely visitors were to make a purchase:
- Every one second of site speed improvement increased conversions by up to 2%
- Every reduction of page loading time by 100 ms grew incremental revenue by up to 1%
Another example is Simyo, who experienced a loss of 25% of conversions for a one-second increase in page loading time.
There are many more case studies like that around the web. Like bounce rates, the effect is especially visible on mobile, which tends to be slower. Pair that with the fact that more people use mobile devices than desktop devices to surf the Internet these days and that users are very fussy about site speed and you will understand the need to make website performance a priority.
3. Decreases Search Rank (Less Organic Traffic)
Because visitors care about site speed, so does Google when ranking websites. This has been official policy since 2010 and extends to mobile since 2018. The latter is even more important since Google has since switched to a mobile-first index to adjust to modern web usage. That means, websites rank according to the performance of their mobile presences, not desktop sites. This includes non-mobile website versions and is a complete reversal of how things used to be. As a consequence, if your site loads slowly on mobile, it will take down your search rank as a whole, not just in mobile search. And while Google says this really only affects the slowest websites, site speed also affects bounce rates, time on site, and other markers search engines take into account. In addition, a slow loading page might negatively impact crawling since crawl bots are on a budget. As a consequence, you might find fewer of your pages indexed by Google.
4. Diminishes User Experience
All of the above basically comes down to one thing: user experience. If it’s poor, that’s bad for your site, if it’s great, it has the opposite effect. In some cases, site speed can even decide whether or not a website is usable for your audience at all. One of the most impressive examples for that comes from the early days of YouTube, Here, reducing the page weight from 1.2MB to 100KB reduced the time it took for users in Asia, South America, Africa, and other remote places to start watching a video from 20min to 2min. Consequently, it opened up whole new markets. Granted, online architecture has greatly improved since then but the point still stands. So, in short, if you want keep visitors on your site, increase conversions, rank well in search engines, and keep visitors happy, you need to provide a great experience in terms of speed at all times and on any screen size.
So, How Fast Should Your Website Be?
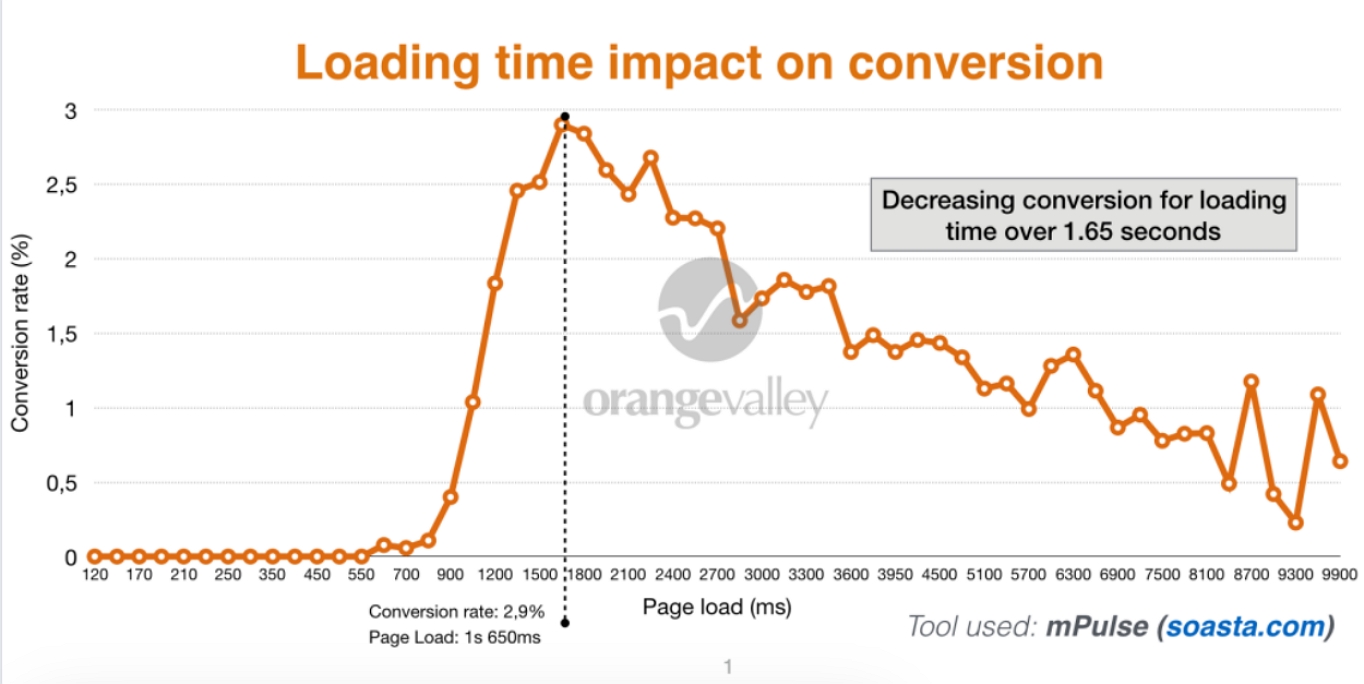
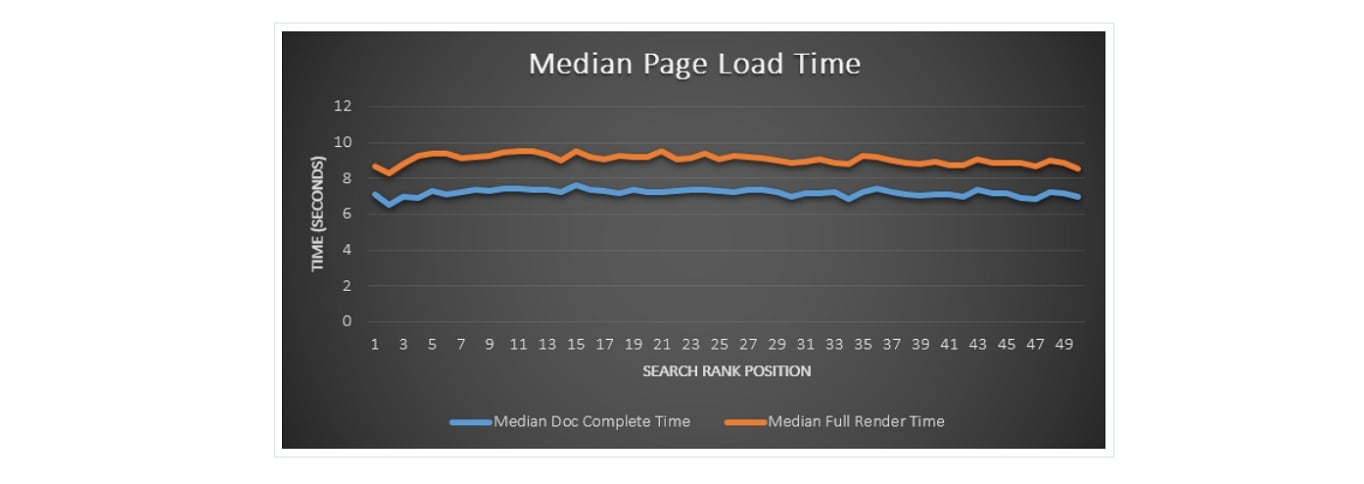
Before getting into how to make your website faster, it’s important to establish a goal. What are you even aiming for? How quickly should your website load? How fast is fast enough? Backlinko found that the average load time for websites on the first page of Google is 1.65 seconds. So, if you want your site to rank there, that might be a good goal to shoot for. Yet, according to Google themselves, the magic number is three seconds. However, as we have already established, the faster the better.

What’s interesting is that, in the same study where Google established the three-second rule, they found that most websites are nowhere near that benchmark.
While that’s bad news for the general user experience on the Internet, it’s actually great news for you! It means that, if you make the effort to get your website speed down to acceptable levels, you will greatly differentiate yourself from the rest of the sites. It’s a great way to give you an edge over the competition in pretty much every area of website success. Sounds pretty good, right? So, without further ado, let’s look at what you can do to speed up your website and achieve that very goal.
Here’s How to Speed Up Your Website Step by Step
In the following, we will go over 24 ways to speed up your website and make it more appealing to visitors. Don’t worry if that sounds like a lot. You don’t have to do everything at once. In fact, we’ll be talking about how to decide what to do first further below. If your site is slow, it’s better to implement just a few changes than do nothing at all. You can always carve out additional time to do more. With that out of the way, let’s go.
1. Run a Speed Test
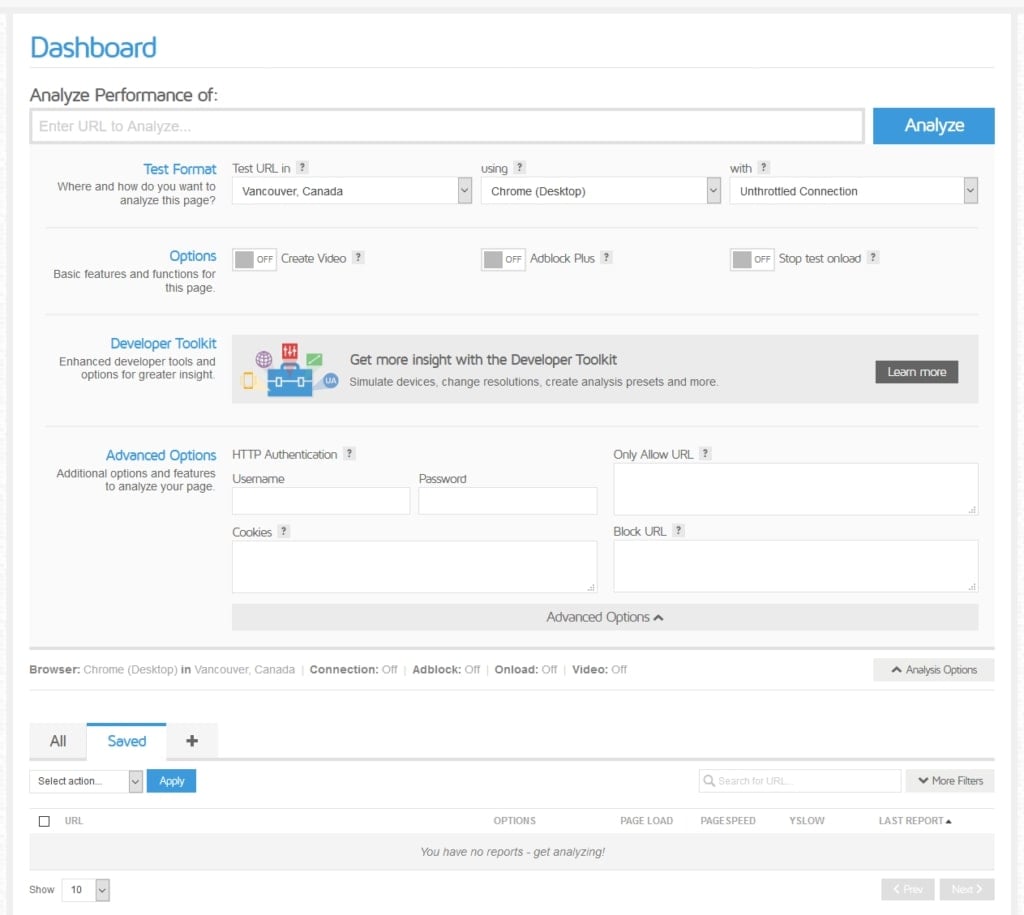
When looking to speed up your website, it’s always a good idea to start with a speed test. This will show you where you stand in terms of loading speed currently and also highlight issues your site might have. You have a number of tools you can use for this. One of our favorites is GTmetrix, however, all of them work very similarly to one another. The first step is to input your URL and hit enter to run the test.

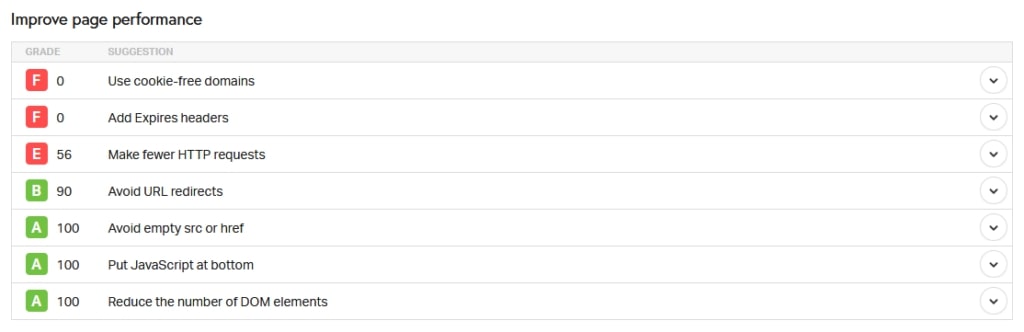
Once it’s done, you will get an overall speed score and information about your site.
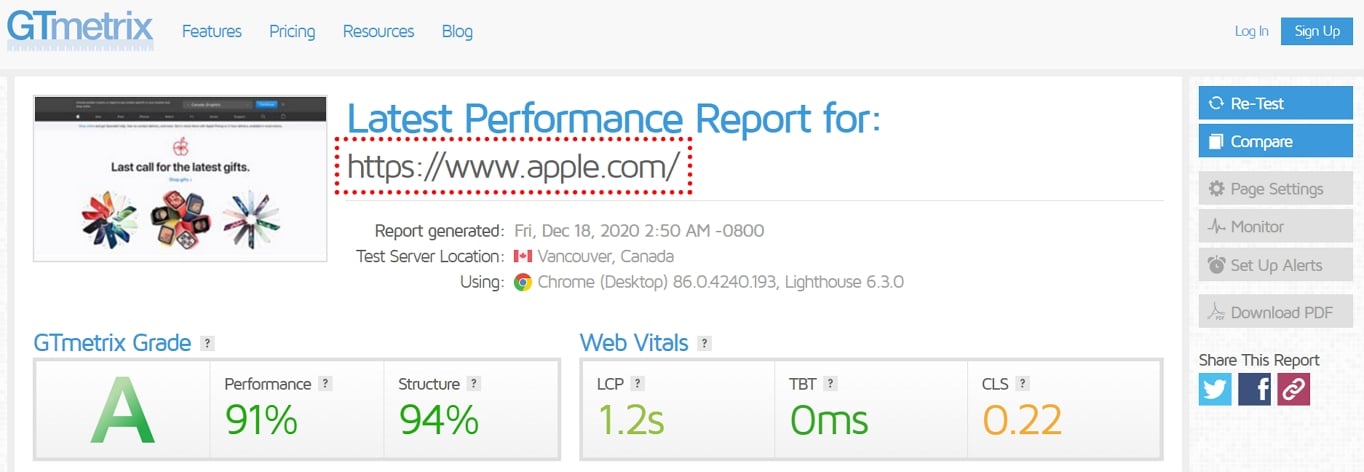
In this section, you will most easily see whether changes you make to your website are making a difference. After that, you will find some concrete advice on how to make your site better. In the case of GTmetrix, the service runs your site against both Google’s and Yahoo’s benchmarks to give suggestions.
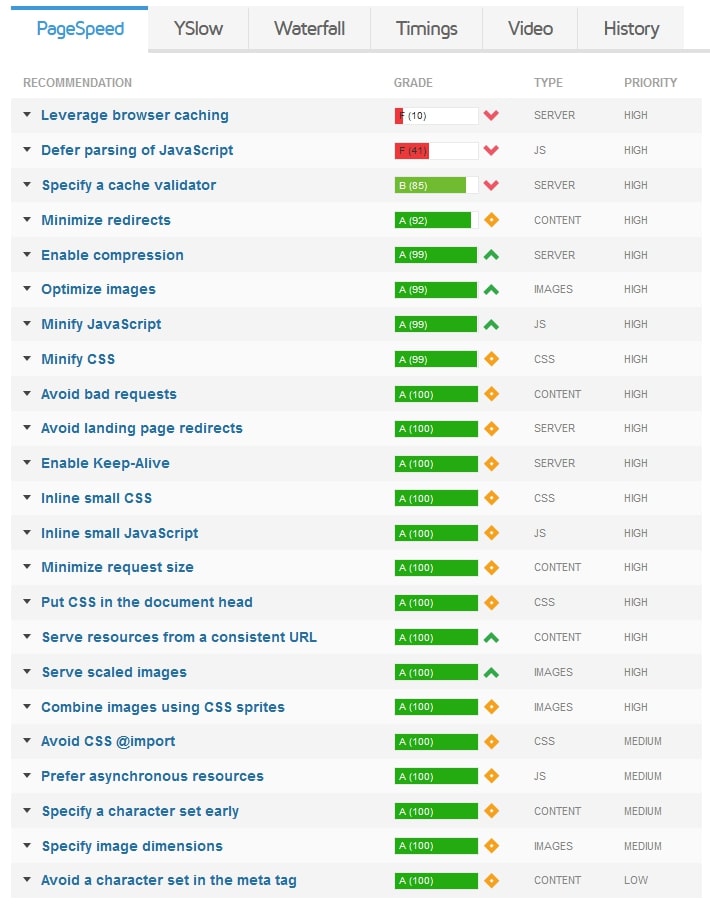
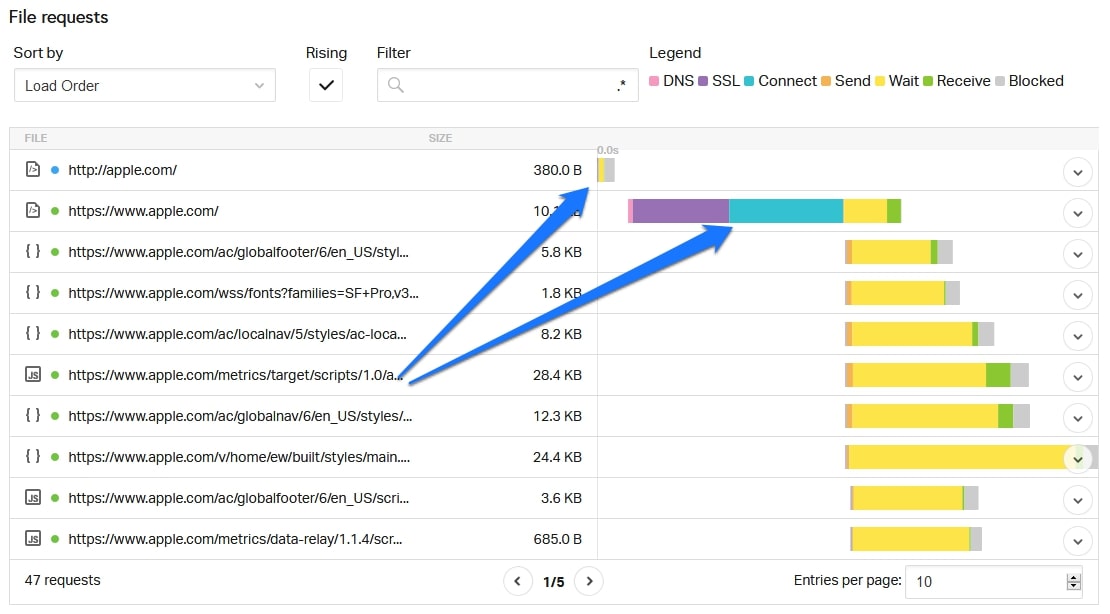
Pay attention to this, it will tell you which of the tips below might be most appropriate for you to start with. Finally, many speed testing tools also have a so-called waterfall diagram.

This shows you exactly what parts of your site are loading in which order and how much time the browser spends with each file and component. They are great to identify bottlenecks and we will reference them often in the course of this article. With a free account, GTmetrix also allows you to configure different testing locations, browser, connection speeds, and more. It will also allow you to save reports for later comparison, automatically monitor pages, and offers additional features. Highly recommended!
Additional Speed Testing Tools
In addition, it is a good idea to check your Google Analytics under Behavior > Site Speed > Page Timings.

This makes it easy to identify individual pages on your site that have a speed problem. Knowing this, you can take more targeted action. Note: This feature is currently not available in the new Google Analytics 4. Besides that, you can also use these website testing tools, all of them free:
- Google PageSpeed Insights — Google’s official tool. It doesn’t have as much information as others on this list but is good for an overview and setting priorities on what to fix first.
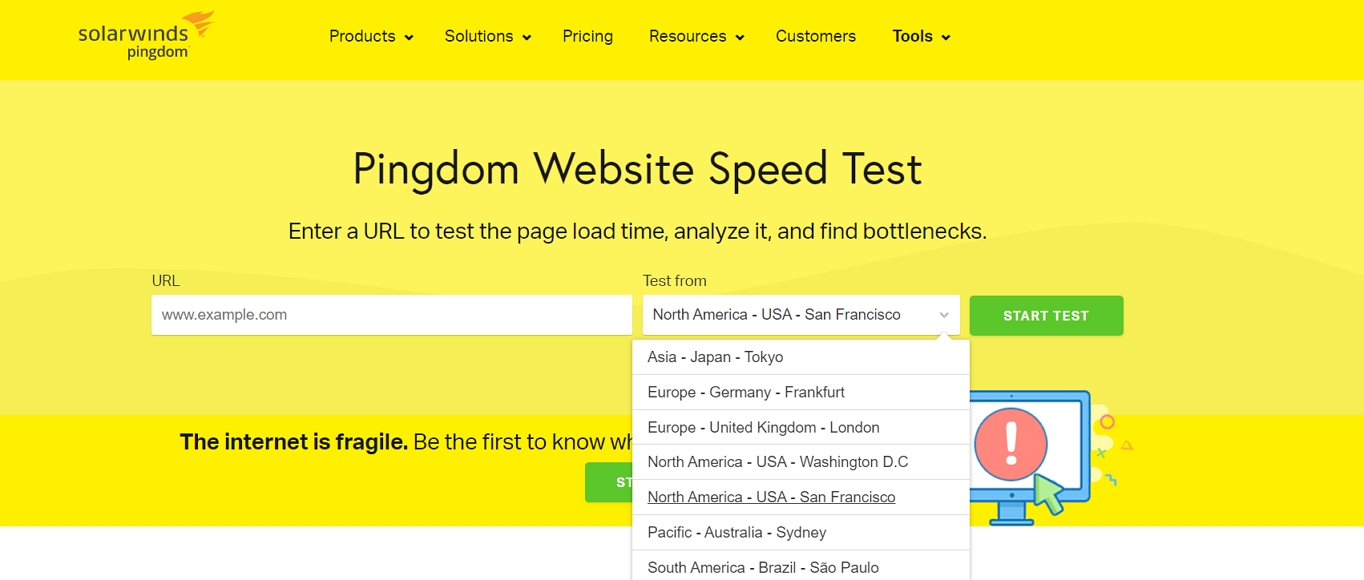
- Pingdom — Very clean and detailed UI with lots of information. Pingdom also allows you to test your site from different locations. The tool also has a premium version with more features.
- Lighthouse — This is built into Chrome developer tools, so you can run it right on the page in question and get results immediately.
- WebPageTest — Collects results from real browsers running on common operating systems. It also allows you to test from many locations and simulate different connection qualities. The tool is very technical but you can dive really deep into your site speed with it.
- Test My Site — Specifically tests your site’s mobile performance, even simulating 3G and 4G connections. Test My Site also allows you to compare yourself to competitors, calculate revenue increases of a faster site, and you can get the full report emailed to you.
No matter which tool you choose, it’s important that you note down your initial results. These will serve as a benchmark that you can measure your steps to improve your site. You might also run the test a few times or from different locations (if available) to find an average as not every speed test will have the same results. After that, it’s time to focus on improving what you see.
2. Check Your Time to First Byte (TTFB)
The time to the first byte is the duration it takes for your site to start loading. Why does that matter? Because Moz has found a strong correlation between TTFB and search rank. They also found that the time until a page is loaded completely and page size didn’t have the same effect.
The official recommendation from Google for TTFB is under 200ms. Yet, according to Backlinko, the average time to first byte is 1.286 seconds on desktop and 2.594 seconds on mobile. So, lots of room for improvement for the average site, possibly including yours. As you can imagine, TTFB is mostly a server issue. It’s the time it takes for the browser to send a request to the server, for the server to process it, and send a response. You can see this number in both browser developer tools and speed testing tools (check the waterfall diagram).
If your TTFB does not fall inside the recommended margin, you have the following options to fix it: Let’s go over a few possibilities for both.
- Improve your server response time OR
- Improve content delivery
3. Pick a Suitable Hosting Provider
As mentioned, your server plays a big part in the time to first byte and how fast your pages load in general. Unless you know how to build servers yourself, you are most likely renting server space from a hosting provider. While it’s ok to use cheap shared hosting in the beginning, once you start getting traffic, you need to make sure your hosting grows with the demands. The first thing to look at here is the type of hosting you use:
- Shared — Literally what it says in the name. You share a server with many other websites, all competing for the same resources as CPU power, RAM, etc.
- Virtual Private Server (VPS) — Similar to shared, however, you have fewer other sites on the same machine and everyone gets their own dedicated processing resources without the possibility to exceed them.
- Dedicated — Here, you have your own server all by yourself, plus control over its setup, hardware, and much more. However, this needs technical skills to handle it or money to hire someone who has them.
- Cloud — The fastest-growing type of hosting. Cloud uses a pay-as-you-use model: you get access to as much or as little processing power as you need. Very good for traffic spikes but also pricier.
- Managed — This is especially available for WordPress and it’s when the provider takes care of most things to do with hosting. This includes things like security, backups, performance, etc. With managed hosting, you can fully concentrate on building your site. This kind of service comes with a price tag though.
So, What Should You Pick?
Pretty much everyone starts off with shared hosting and that’s fine. However, at some point, the server setup can become a bottleneck for your site speed. At that point, it’s time to upgrade to something more suitable. One thing to keep in mind in this is location. As we will discuss more below, it matters how far your data has to travel. The further the distance between your server and the person requesting to see your site, the more latency will be in the response. You can test this for yourself by loading your site from different locations in one of the speed testing tools.
For that reason, it’s good to pick a hosting provider who has a data center near where most of your audience resides. Just something to keep in mind when choosing a new host. For a very technical breakdown of latency and TTFB, check this post on Moz. Alternatively, see the next point.
4. Improve Server Response Time
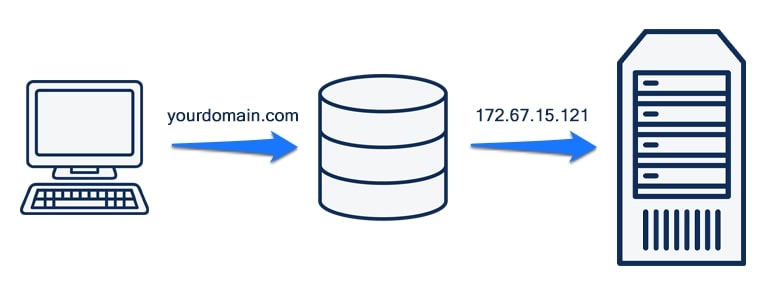
If your server response time is slow, one of the biggest factors here can be the DNS lookup. In case you didn’t know, DNS stands for domain name system. It consists of servers that have a database with information about which domain name belongs to which IP address. IP addresses are sequences of numbers like 172.67.15.121, which identify every device on the Internet. However, because they are hard to remember, we invented domain names and set up a place that knows which domain name belongs to which IP. All clear so far? The consequence is that, when someone requests to see a website by typing the domain into their browser, the first request goes to the DNS, which then moves it on to the respective IP address.
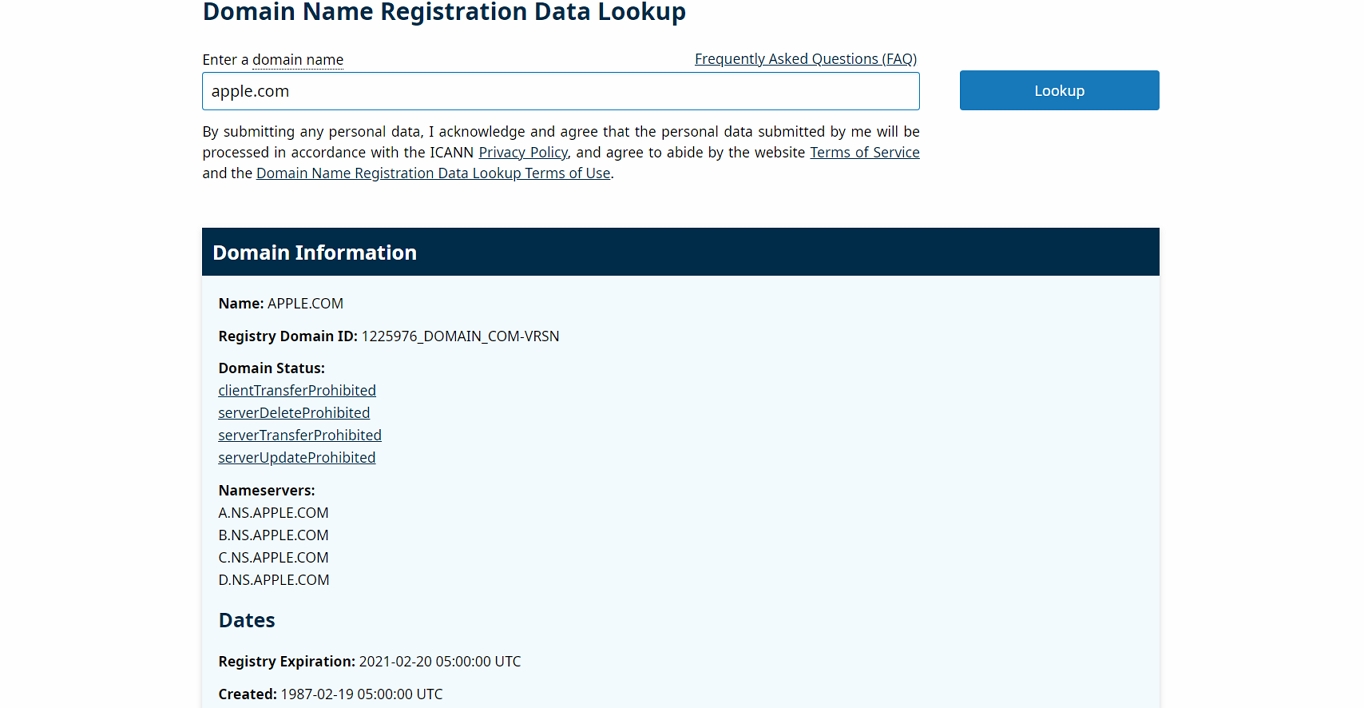
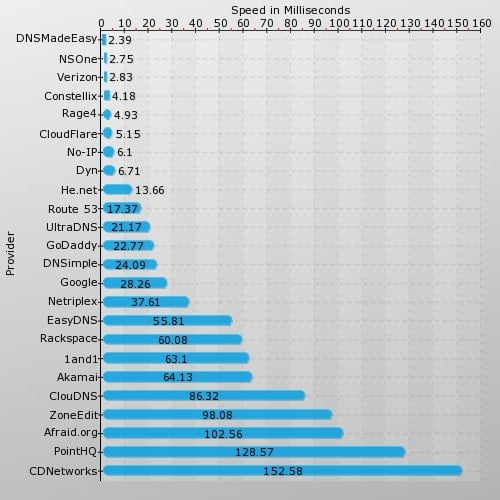
Of course, if the DNS is slow, this will increase the overall page loading time. So, if TTFB is a problem with your site, one potential remedy is to change to a faster DNS provider. To be fair, Apple probably doesn’t have to worry about their nameservers to speed up their website… The first step for that is to look up which DNS you are currently using. You can do that by entering your domain name on this page.
After that, you might want to check this comparison of DNS providers (updated monthly) to see where you are standing.
If you find that your DNS performance could be better, you can sign up to a different provider (e.g. Cloudflare, which offers a free DNS) and then point your domain to the new nameservers. Example instructions are available here. Yet, the process will be similar for all providers.
5. Consider Changing to HTTP/2
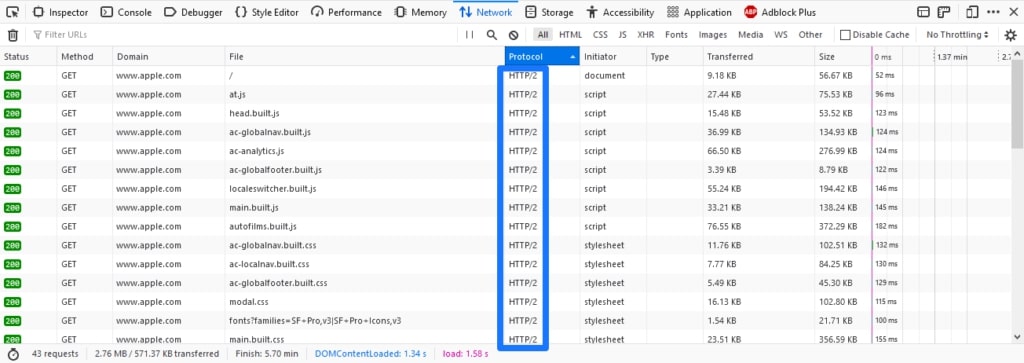
The Internet is running on the HTTP protocol. It makes connections between browsers and servers possible and is an integral part of data communication on the web. Besides that, it’s also the reason why web addresses start with HTTP:// or HTTPS://. However, did you know that there are different versions of the HTTP protocol? It’s true, HTTP/2 came out in early 2015 and comes with several speed improvements that allow browsers to load websites faster (check the link for technical details). To see if your site already supports HTTP/2, go to the Network tab of your browser developer tools (you might have to enable the Protocol column with a right-click).
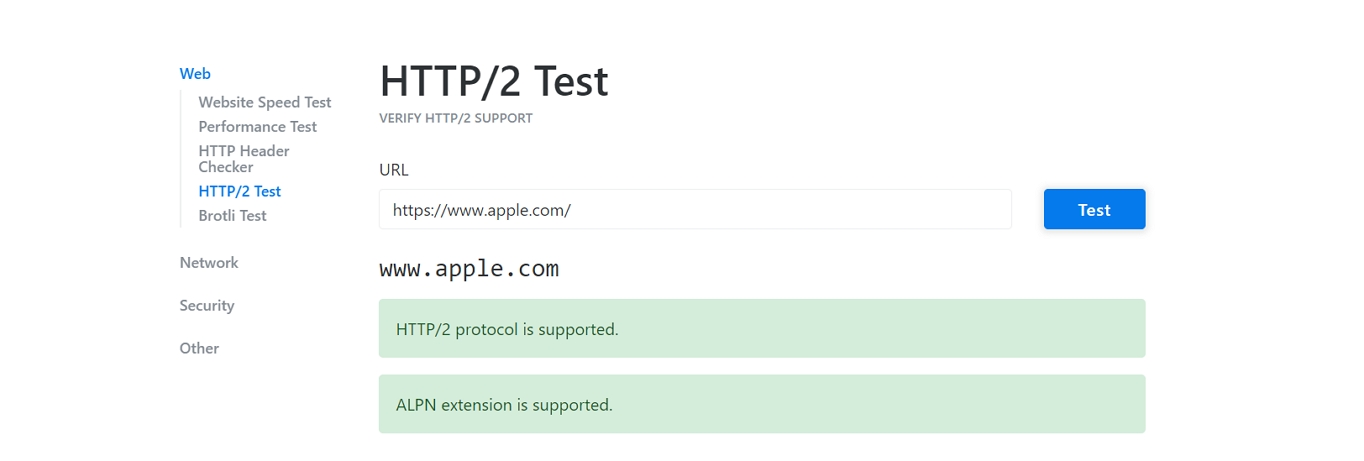
Alternatively, use this tool by KeyCDN.
If it doesn’t, the first step in moving your site from HTTP to HTTP/2 is to check your Google Analytics to see which browsers your users predominately visit your site with. You find this information under Tech > Tech Details or Audience > Technology > Browsers & OS, depending on which version of Google Analytics you are using. Compare that to the browsers that currently support HTTP/2. After all, it doesn’t make sense to implement something if your audience is not going to benefit from it.

Secondly, if you want to make the switch, you need to move your site from HTTP to HTTPS. The new protocol is only available over secure connections. The actual switch of your server from one protocol to another is pretty technical, so it might be best to ask your host to assist you. If you want to try it yourself, you find the instructions for Apache servers here and for NGINX on this page. Alternatively, some CDNs like Cloudflare (see below) also deliver data over HTTP/2 by default.
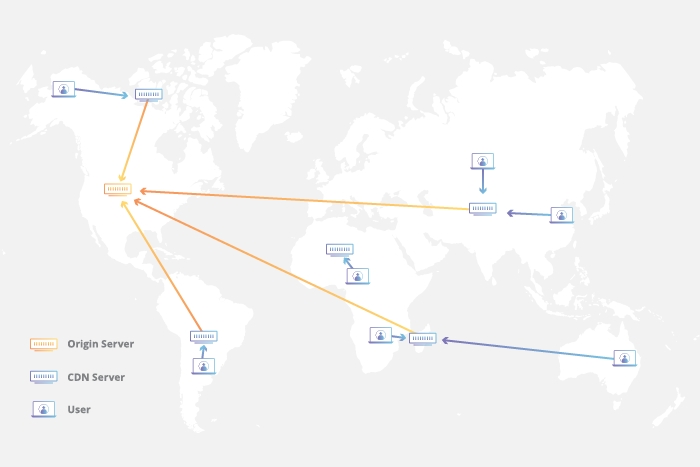
6. Use a Content Delivery Network (CDN)
If you are catering to a global audience, there is an alternative way to deal with the aforementioned problem of latency and location: content delivery networks. These are basically networks of computers located all around the world that all contain a copy of your website or at least its most important static files.
Using CDNs has several benefits in terms of speeding up a website:
- Users receive the data from the location nearest to them. This reduces the distance and thus the chance that lags and latency increase page loading time.
- Server load can be distributed among a number of servers instead of just one. This lowers the probability of bringing download speed to a crawl during times of high traffic.
7. Enable Compression
Generally, you should try to keep page weight as small as possible. According to Google, the best practice is to stay under 500KB, even if the majority of websites is way above that.
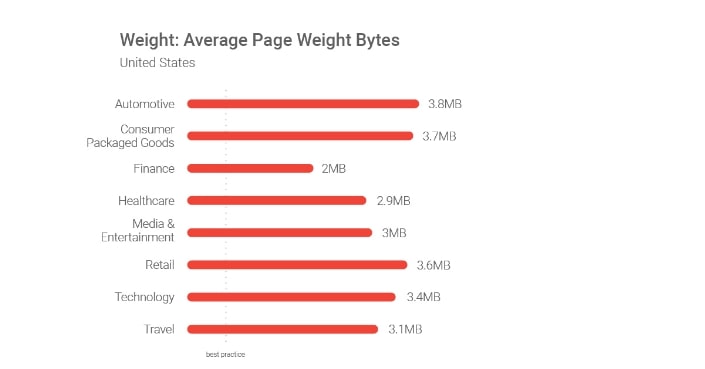
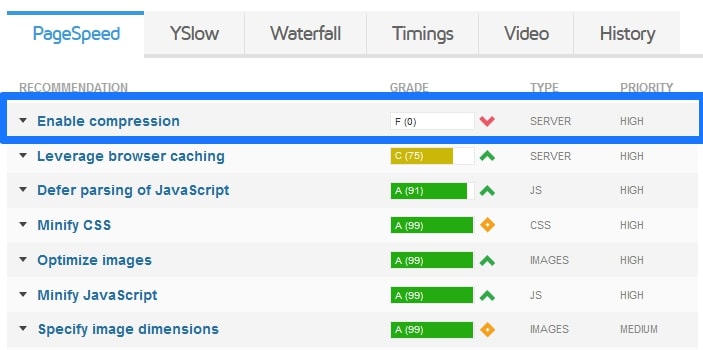
Is yours one of them? Then one way to shrink it and speed up your website is to use compression. You are probably familiar with this concept from zip files on your computer. It’s a way to reduce file size to, for example, transfer them faster. The same thing is possible on your server. Plus, it’s actually something that modern browsers will request by default. The first step here is to check if compression is already active on your website. You can usually see that in the speed testing tools discussed above.
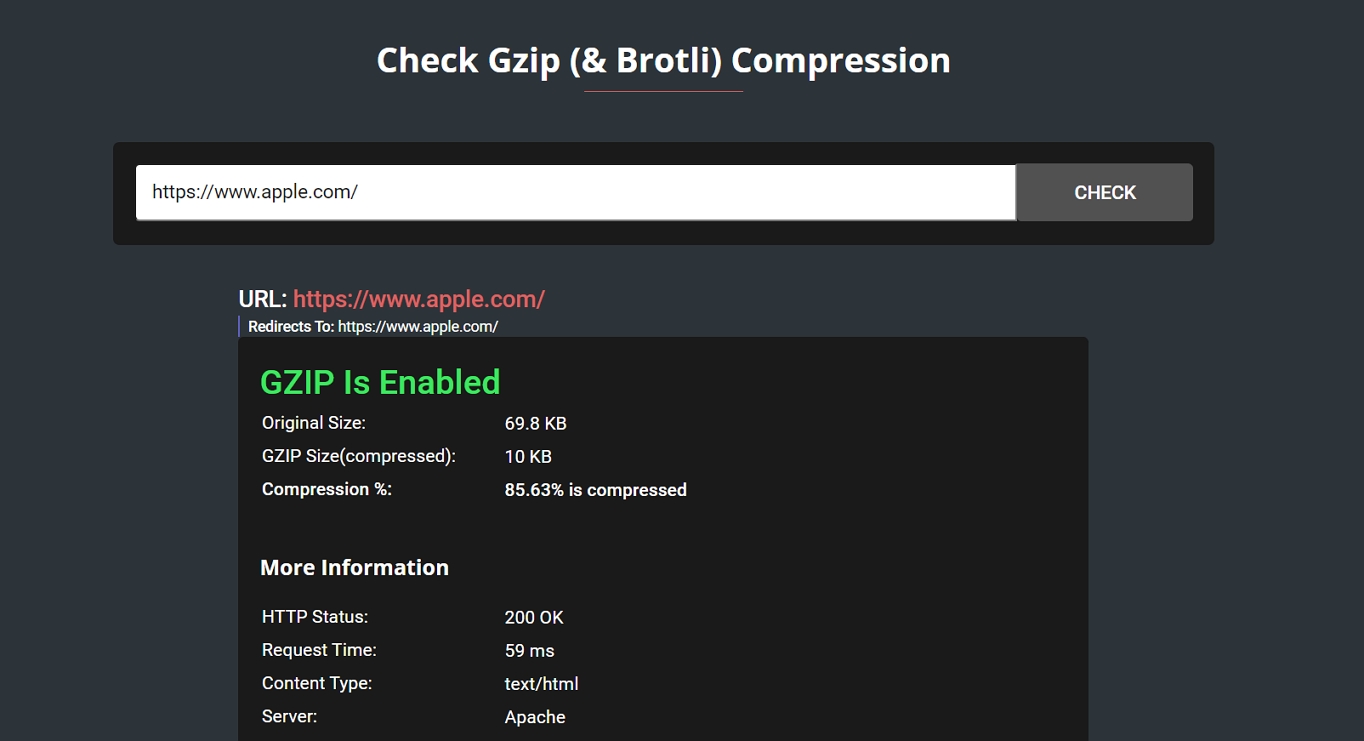
However, there are tools like this one where you can simply enter your site address and it will tell you about your compression status.
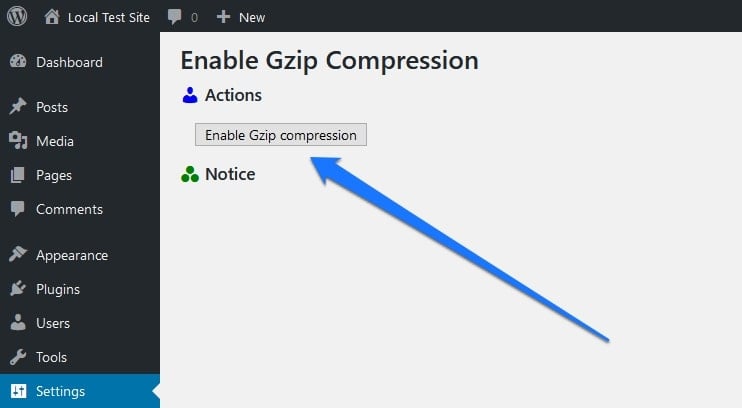
The standard compression method online is Gzip. However, there are also more modern ones like Brotli that are gaining in popularity. If you are running a WordPress site, caching plugins like W3 Total Cache, WP Fastest Cache, or WP Super Cache usually contain settings to enable Gzip compression. We will mention these plugins several times throughout this post. Alternatively, you can also use the aptly-named Enable Gzip Compression plugin to set it up.
Alternatively, switch it on manually by adding the code below to the .htaccess file on your server, if it’s running Apache.
<IfModule mod_deflate.c>
  # Compress HTML, CSS, JavaScript, Text, XML and fonts
  AddOutputFilterByType DEFLATE application/javascript
  AddOutputFilterByType DEFLATE application/rss+xml
  AddOutputFilterByType DEFLATE application/vnd.ms-fontobject
  AddOutputFilterByType DEFLATE application/x-font
  AddOutputFilterByType DEFLATE application/x-font-opentype
  AddOutputFilterByType DEFLATE application/x-font-otf
  AddOutputFilterByType DEFLATE application/x-font-truetype
  AddOutputFilterByType DEFLATE application/x-font-ttf
  AddOutputFilterByType DEFLATE application/x-javascript
  AddOutputFilterByType DEFLATE application/xhtml+xml
  AddOutputFilterByType DEFLATE application/xml
  AddOutputFilterByType DEFLATE font/opentype
  AddOutputFilterByType DEFLATE font/otf
  AddOutputFilterByType DEFLATE font/ttf
  AddOutputFilterByType DEFLATE image/svg+xml
  AddOutputFilterByType DEFLATE image/x-icon
  AddOutputFilterByType DEFLATE text/css
  AddOutputFilterByType DEFLATE text/html
  AddOutputFilterByType DEFLATE text/javascript
  AddOutputFilterByType DEFLATE text/plain
  AddOutputFilterByType DEFLATE text/xml

  # Remove browser bugs (only needed for really old browsers)
  BrowserMatch ^Mozilla/4 gzip-only-text/html
  BrowserMatch ^Mozilla/4\.0[678] no-gzip
  BrowserMatch \bMSIE !no-gzip !gzip-only-text/html
  Header append Vary User-Agent
</IfModule>
When using an NGINX server, add the following to nginx.conf.
gzip on;
gzip_disable "MSIE [1-6]\\.(?!.*SV1)";
gzip_types text/plain text/css text/javascript image/svg+xml image/x-icon application/javascript application/x-javascript;
gzip_vary on;
8. Take Advantage of Caching
Generally, caching means storing parts or the entirety of your website in such a way that they are quicker to access and thus load. For example, when someone requests to see a page on a WordPress site, the server typically creates the HTML page from PHP files and fills it with content pulled from a database. However, it’s also possible to store the finished HTML page and serve it right away.

As you can imagine, this saves a lot of processing time and allows visitors to see that page sooner. This is exactly what caching is, in this case server caching, and there are a few more possibilities:
- Browser caching — Tells browsers to store fixed assets like style sheets or JavaScript files on the local hard drive. That way, the browser can simply use them from there instead of downloading them again. This is especially useful for repeat visitors.
- Object caching — Stores queries to the database in the local memory of the server so that it can answer them without actually having to access the database. It’s best to only use this on VPS or dedicated hosting, on shared it might have the opposite effect.
- Edge caching — This means saving files on a server closer to the end-user. We have already covered this when we were talking about CDNs.
As for how to enable caching, in WordPress, you can use the aforementioned plugins. They usually offer several ways of caching your site. When using a static website, you can set up browser caching inside your .htaccess file with the code below (this also works for WordPress by the way).
<IfModule mod_expires.c>
  ExpiresActive On

  # Images
  ExpiresByType image/jpeg "access plus 1 year"
  ExpiresByType image/gif "access plus 1 year"
  ExpiresByType image/png "access plus 1 year"
  ExpiresByType image/webp "access plus 1 year"
  ExpiresByType image/svg+xml "access plus 1 year"
  ExpiresByType image/x-icon "access plus 1 year"

  # Video
  ExpiresByType video/webm "access plus 1 year"
  ExpiresByType video/mp4 "access plus 1 year"
  ExpiresByType video/mpeg "access plus 1 year"

  # Fonts
  ExpiresByType font/ttf "access plus 1 year"
  ExpiresByType font/otf "access plus 1 year"
  ExpiresByType font/woff "access plus 1 year"
  ExpiresByType font/woff2 "access plus 1 year"
  ExpiresByType application/font-woff "access plus 1 year"

  # CSS, JavaScript
  ExpiresByType text/css "access plus 1 month"
  ExpiresByType text/javascript "access plus 1 month"
  ExpiresByType application/javascript "access plus 1 month"

  # Others
  ExpiresByType application/pdf "access plus 1 month"
  ExpiresByType image/vnd.microsoft.icon "access plus 1 year"
</IfModule>
The above basically tells the browser how long to keep different types of files. For more information about which settings make sense, check this post.
9. Reduce Image Size
Images play a special role in speeding up websites as they are usually one of them, if not the largest elements on web pages.
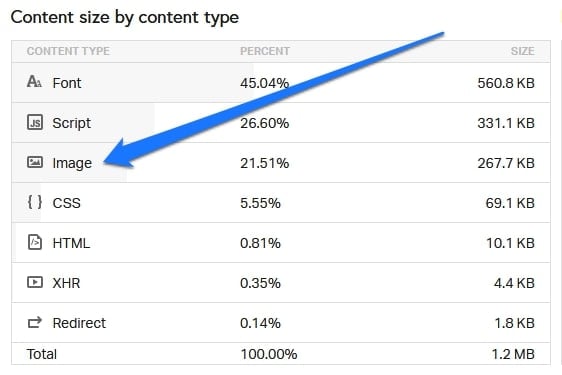
That’s because they contain a lot more information than simple text and are thus larger in size and take longer to load. Consequently, when not optimized, image files can easily be several to dozens of MB in size. If you think about the fact that for Google the ideal page size is below 500KB, this easily becomes a problem. However, images are also important to make online content appealing and deliver additional information. In the case of selling products, they are actually indispensable. So how do you get those two together? By making images as small as possible.
How to Shrink Your Images
Here are several ways of making sure your image size does not get out of control:
- Use the right file type — Several image file types exist each with its own strengths and weaknesses. JPG is a good option for images with many colors like photos. PNG is great for text-focused graphics with less than 16 colors or images with transparent backgrounds like logos. GIFs, on the other hand, are perfect for animated images or tiny elements with few colors like icons.
- Crop images to the size they appear in — If an image is only 500px wide on screen, it’s a waste of resources to post a 1,000px image and shrink it via the width and height attribute. This still results in loading the full-sized visual. Consequently, first your image crop to only the part you need, then resize to as little as needed. Here’s a tool that can help with the latter.
- Compress images — Just like other files on your server, you can compress images so that they are smaller — without losing image quality. In WordPress, you can use a plugin like Smush, EWWW Image Optimizer, or Optimole. They compress images automatically during upload or in bulk. For other types of sites, there are services like TinyPNG/JPG, Compress JPEG, or Optimizilla where you can compress images before uploading them to your site. You can also use desktop tools like ImageOptim (for Mac only), Caesium, or RIOT (both for Windows). There’s also Crush.pics for Shopify sites.
If you want to get really technical, you can also use sprites. Here, you combine many images into one and then only show what you need via CSS. This is a bit technical so we won’t cover it here but the linked article is a great introduction. It’s also most suitable for sites using the older HTTP protocol, not HTTP/2.
10. Use Lazy Loading for Images
Another way to optimize your images for faster page loading time is to not load them at all — at least until they are visible on the screen.
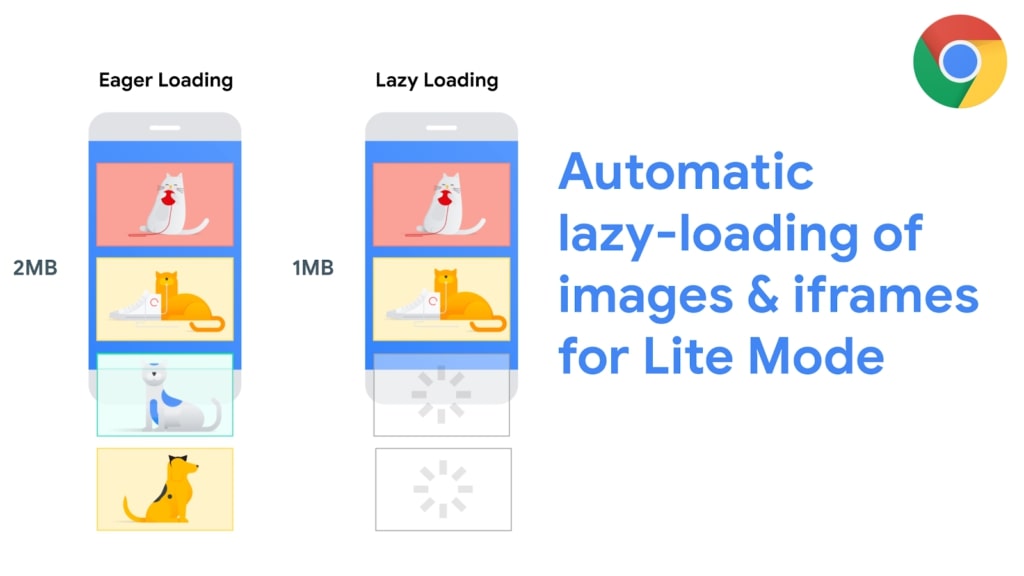
This technique is called lazy loading and is a crucial way to speed up image-focused websites or blog posts that include a lot of visuals. How do you implement it? If you are using WordPress, you are in luck. The platform added native lazy load with version 5.5. Consequently, all you need to do is make sure your site is up to date. Aside from that, many of the caching and image optimization plugins mentioned above also support this feature. For non-WordPress users, one of the easiest ways is to add the loading="lazy" attribute like so:
<img src="image.jpg" alt="..." loading="lazy">
<iframe src="video-player.html" title="..." loading="lazy"></iframe>
However, there are other possibilities, discussed at length on CSS Tricks.
11. Disable Hotlinking
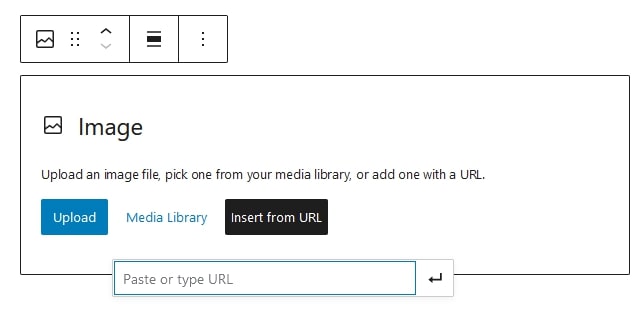
You might be aware of the fact that you can include images on your site that reside on a whole other website. It’s as simple as including an img element with a third-party URL as its source.
<img src="https://www.somedomain.com/images/cutedog.jpg" alt="">CMS like WordPress also have the functionality to achieve this:
However, overall this isn’t a very good deal for the person hosting the image. That’s because, even when the image appears on a different website, loading it still puts a strain on the original server and steals the bandwidth. Therefore, you may want to disable this kind of hotlinking, which is what it’s called, on your own website. There are several ways to prevent hotlinking on your site. For one, some CDNs offer hotlinking protection. Additionally, if you are using WordPress, there are plugins like All In One WP Security & Firewall that allow you to disable it as well. Finally, you can simply add the code snippet below to your .htaccess file to disable hotlinking (be sure to replace the example URL with your own).
RewriteEngine on
RewriteCond %{HTTP_REFERER} !^$
RewriteCond %{HTTP_REFERER} !^http://(www\.)example.com/.*$ [NC]
RewriteRule \.(gif|jpg|jpeg|bmp|zip|rar|mp3|flv|swf|xml|php|png|css|pdf)$ - [F]
Thanks to Media Temple for the code!
12. Host Videos Externally
Using videos is a great idea to spruce up your content, deliver additional value to your visitors, and give them more information about your site or business. Do you know what’s not a great idea? Hosting videos yourself. Why is that? Well, first of all, they take up a lot of server space. Videos are easily hundreds of megabytes in size. Secondly, when dozens or even hundreds of thousands of visitors watch videos on your site at the same time this will be a huge drain on your bandwidth. Consequently, your site speed will suffer. For that reason, it is a much better idea to upload your videos to an external service and then embed them on your site. This removes the burden from your own server and you can take advantage of the optimized infrastructure video hosting services offer.
Available Options
As for where to host your videos, here are a number of possibilities:
- YouTube — Free to use and with a huge audience (2 billion monthly logged-in users), YouTube is the second-largest search engine in the world. You can upload videos up to 128GB, which are easy to embed, and it’s possible to make videos private. On the other hand, YouTube is ad-supported and thus not suitable for online courses and such.
- Vimeo — This service is a lot more curated than YouTube and comes with a nicer design. Free users can upload 500MB per video per week, which goes up to 256GB with a paid plan. There are no ads, videos are downloadable, but, of course, there is a much smaller audience.
- Wistia — Less of a video platform and more of a real video hosting and digital marketing service. Max file size is 8GB and max video length two hours. The service offers detailed analytics and a customizable player including marketing tools like calls to action and email sign-up. There are no ads, however, if you need more than three videos, plans start at $99/month.
- Jetpack — If you are a WordPress user, you can take a look at Jetpack video hosting, which is included in every premium plan (from $9/month). It allows up to 2GB per video (2TB limit overall) and comes with a customizable video player.
As for how to embed videos, WordPress offers a lot of auto embeds. Here, you only need to copy and paste the URL from the video page into the editor and it will take care of the rest. For cases without auto-embed and non-WordPress websites, you usually copy and paste an HTML snippet where you want it to appear on your site.
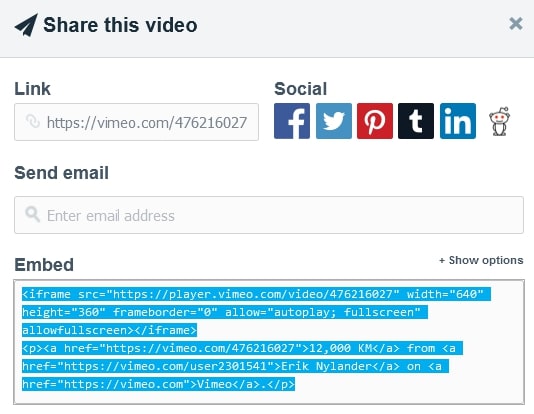
Easy peasy.
13. Check for Plugins that Slow Down Your Site
While plugins are great as a way to make sites more functional and add features, there is such a thing as too many plugins. Installing them on your site indiscriminately not only increases the risk for security issues and conflicts as well as the need for maintenance, it can also slow down your site. Why is that? Many plugins load extra style sheets and/or JavaScript files, adding to page weight and HTTP requests. Plus, if they are not coded properly, they might load these assets even in places where they are not needed, sometimes on every page! So, in an effort to speed up your website, it’s a good idea to see if you can get rid of any of them. One way to do this is to speed test your site with all plugins enabled, then selectively disable them one by one and running another speed test each time. This makes the most sense if you don’t have a lot of plugins on your site, as it can be tedious. An alternative is to use the Plugin Performance Profiler. It allows you to scan your site and gives you a breakdown of how much each plugin contributes to your page loading time.
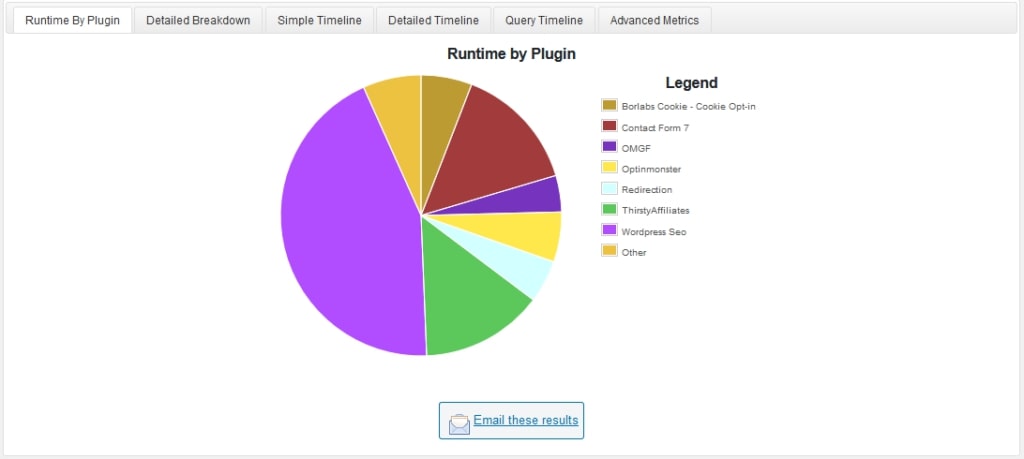
The plugin can also do the same for individual pages. This helps you find out what is slowing down your worst performers. For instructions on how to do that, check the plugin page. Plus, P3 keeps a record of all tests performed, so you can go back and compare your current performance with past instances. Going through this process makes sense even if you don’t have a lot of extensions on your site. I will help you find out if any of them puts the breaks on your page loading speed.
14. Reduce the Number of Website Components
Once you have identified the worst offenders in terms of page performance on your site, you have the following options:
- Delete plugins you don’t actually need — Often, you will have plugins still on your site that you don’t actually use anymore. Or, you might realize there are some that you can do without. In either case, simply delete them from your site.
- Deactivate plugins you only use periodically — If you have extensions that you don’t use continuously but only once in a while (e.g. the Performance Profiler plugin), you can deactivate them until actually needed. That way, they don’t slow down your site in the meanwhile.
- Find alternatives — The WordPress sphere is huge and you often have more than one plugin for any given functionality. If you find that you have one on your site that greatly slows it down, check if there’s another that performs better and does the same thing.
- Consolidate — There are a lot of plugins that perform a wide variety of functions. For example, Yoast SEO also creates an XML sitemap, so you don’t need an extra plugin for that. See if you can replace some by simply activating or using the same functionality in another.
- Focus — On the flipside, if you are using a huge plugin with many features but you only take advantage of one or two of them, check if you can find a leaner alternative that does just that those things.
- Implement plugin functionality by hand — You often have plugins on your site to do stuff that you could do yourself with a little technical knowledge. Examples include things like using custom fonts. Sure, plugins exist but these tasks are actually not that hard to learn, so if you do them yourself, you can get rid of the plugin altogether.
Less is more and leaner is always better. By the way, much of the above is also true for other website components like themes.
15. Reduce HTTP Requests
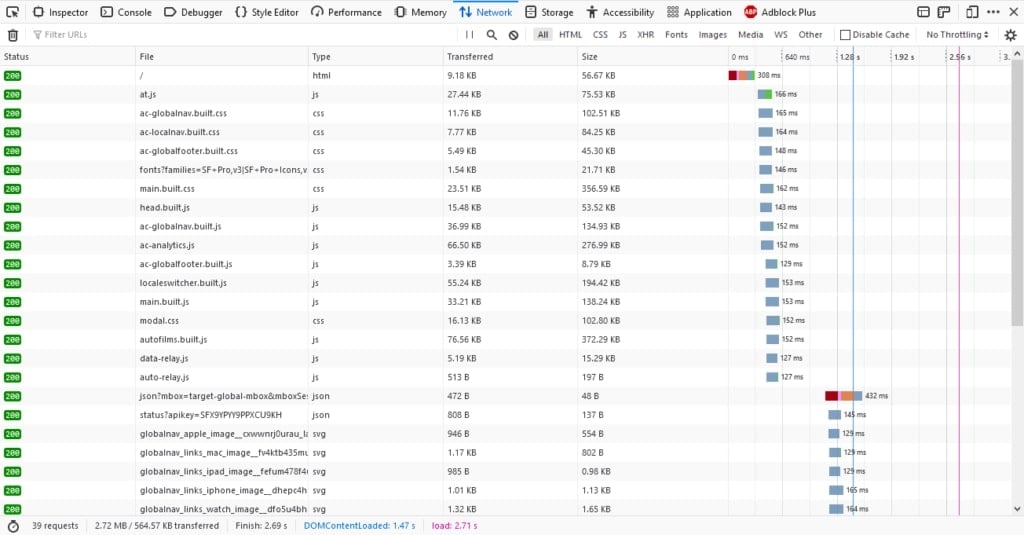
HTTP requests happen whenever the user browser asks for something from the server. This can be an HTML file, CSS style sheet, image, or anything else that makes up a web page. Completing every request takes time, so naturally, the more of them there are, the longer it takes to load a page. Plus, the browser will only start rendering the page once it has the files it needs. Therefore, it’s a good idea to make your pages as lean as possible to make them load faster. If you have done a speed test above, you have already seen HTTP requests in the waterfall diagram. In addition, you can also check them in the browser developer tools, usually under Network.
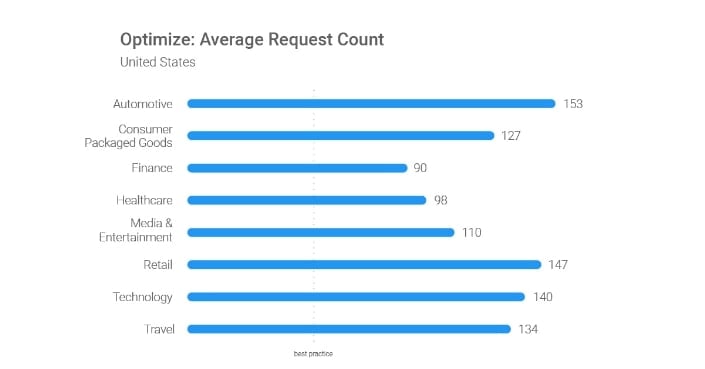
How many requests should you shoot for? If it’s up to Google, no more than 50. Yet, the average number of requests on the desktop is 73 and on mobile, it’s 68. The Google study we have already mentioned a few times had even worse findings.
If a large number of requests is a problem on your site, here’s what to ask yourself:
- Are there any requests you can eliminate completely (like elements you don’t need on the page, scripts that load but aren’t used, etc.)?
- Are there any bottlenecks that need addressing (e.g. files that load very slowly and stall out the process)?
Let’s go over the steps that address this issue.
16. File Minification and Concatenation (Combining Files)
One way to reduce the number of requests is to combine several files into one and reducing the size of individual files. Let’s go over how these two measures work:
- Browsers usually download one bigger file faster than several smaller ones. Therefore, offering the same code in fewer files is a good way to speed up websites. It also reduces the number of HTTP requests and is a great option for CSS and JavaScript.
- Files that contain code usually also contain lots of formatting that’s only there to make the markup more legible for humans. Think indents, line breaks, comments, spaces, etc. Browsers need exactly none of that to process the files and eliminating it reduces the file size, making it faster to download.
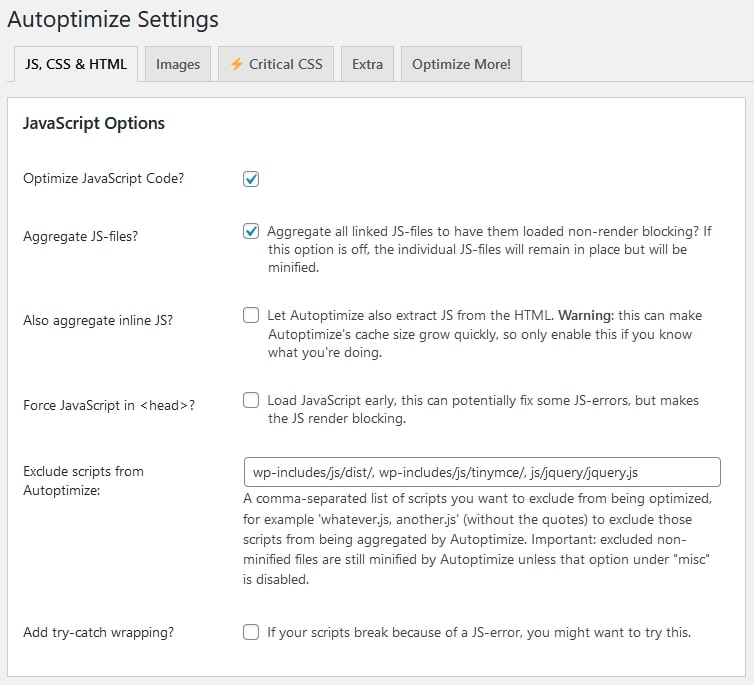
Quick note: File combination is no longer necessary under HTTP/2 (and might actually hurt your speed). Prime candidates for minification are your HTML, CSS, and JavaScript files but it’s also possible for other file types. However, how can you do this on your own website? For WordPress, there are the usual cache and optimization plugins. A plugin that makes implementing minification and concatenation really easy is Autoptimize. It’s very set-it-and-forget-it and can also do things like lazy load images, so highly recommended.
When using a static HTML website or some other way to build your website, you can use a task runner like Grunt, which has several plugins for this. There are also code editors that can save files automatically minified via plugins, like shown here. Finally, you can use online code minifiers like this one.
17. Load CSS and JavaScript Files Asynchronously
This is another way to help the files that make up your website load faster. To understand how it helps, you first have to understand the difference between synchronous and asynchronous loading. The first one means that files like CSS style sheets and JavaScript scripts load one at a time in the order they appear on the page. In this case the browser doesn’t continue until it has finished loading a particular file. When files load asynchronously, the browser keeps going down the line without waiting for a file download to be finished. As a consequence, it will load several files at the same time, reducing bottlenecks and loading more quickly. Therefore, it’s an effective way to speed up your website. Thanks to HTML 5, for JavaScript scripts, you can achieve this by simply adding the async attribute to the call on the page, like so:
<script src="..." async></script>For methods compatible with older browsers, I can recommend this post on CSS-Tricks. WordPress users can take advantage of the aptly named Asnyc JavaScript plugin. On the other hand, you can asynchronously load CSS files with this markup:
<link rel="stylesheet" href="..." media="print" onload="this.media='all'">I highly recommend that you read the accompanying post before applying it to all of your style sheets though.
18. Defer JavaScript
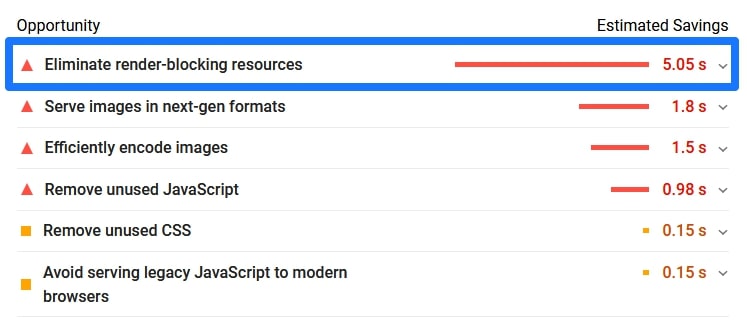
If you defer a file, it means that it won’t load until other files have finished loading. This is especially useful for larger files that are unnecessary for fully rendering a page, which is often true for JavaScript files. In speed testing tools, these are often called “render-blocking resources” and you get asked to load them in the footer.
There’s a similar attribute as async for that in HTML (you can also use the two of them together).
<script src="..." defer></script>To understand the difference between the two here is a useful diagram:
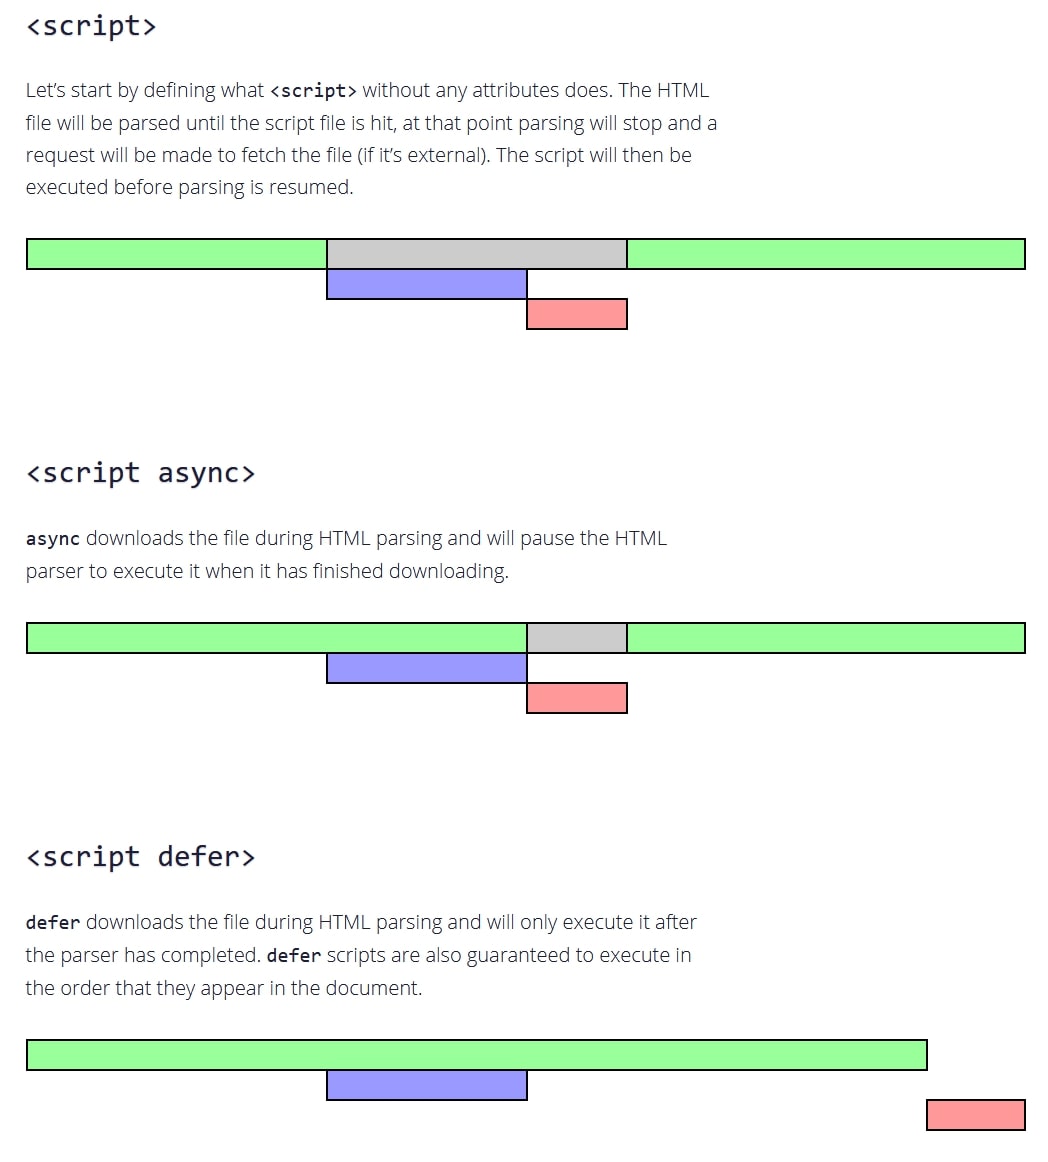
In WordPress, you can use the aforementioned Async JavaScript plugin, which can also defer scripts or this code from Kinsta. Many of the caching plugins also have options to automatically move render-blocking resources to the footer.
19. Optimize CSS and JavaScript Delivery
There are two ways that CSS can appear on your site: in an external style sheet or inline right on the page. We have discussed style sheets at length by now. On the other hand, inline CSS looks like this:
<p style="color:red;">...</p>The same is also true for JavaScript, though I would claim that inline JavaScript is a little rarer than inline CSS. Either way, in order to speed up your website, you should generally place code like that into separate files, and here is why:
- Inline code can be repetitive and thus wasteful
- It’s much cleaner to have everything in one style sheet or script file
- Having code in a separate file allows you to take advantage of many of the techniques we already discussed: caching, deferring, loading asynchronously, etc.
- Placing all code in as few files as possible decreases HTTP requests the browser has to make
To check the number of external style sheets and instances of inline CSS, you can use this tool. Aside from that, it takes a bit of detective work to find inline styles and scripts. What helps is to open your website, right-click, and choose View Page Source.
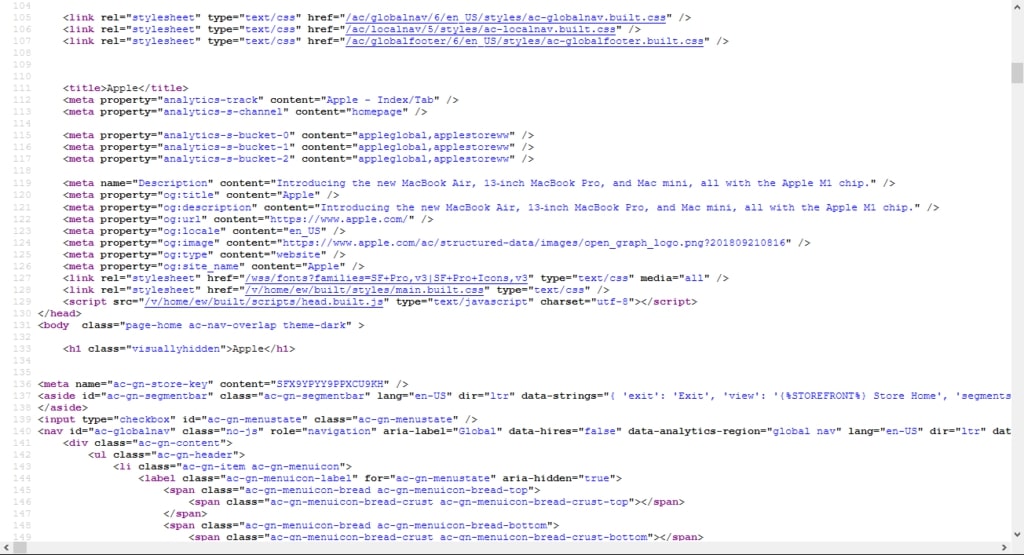
Then, search for style= to find inline CSS styles and <script> for scripts that are not called in from the outside. To fix either, move it to a style sheet or external script. Even if you have some code that you only need for a single page, be sure to put it into its own file and only load it on that very page. Otherwise, it might hurt your overall site speed.
20. Get Rid of External Scripts
Yet, what about eliminating scripts altogether? Now, some of them are necessary of course. Examples include custom fonts, social integrations, analytics, etc. However, not all of them are always needed or you might not even be aware that they are on your site and can potentially add to loading time. For that reason, it’s a good idea to check on this. One of the easiest ways to do so is the waterfall diagram on GTmetrix. It allows you to filter by type of file, making it much easier to look at all JavaScript files on your site at once. Plus, you can also see how much each contributes to page loading time.

Eliminate what you don’t really need and can do without.
21. Reign in Redirects
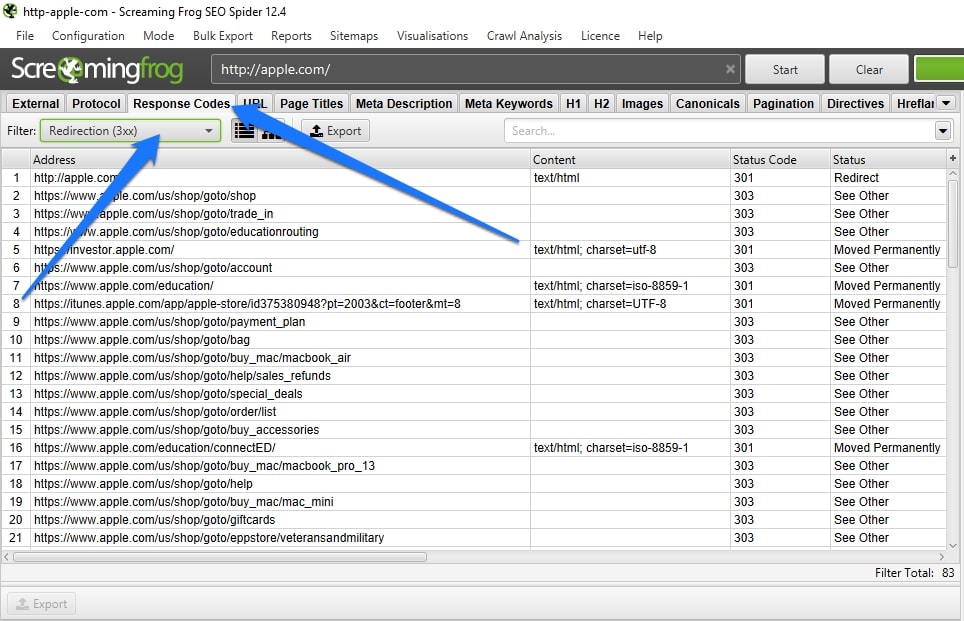
Redirects are a common tool to send traffic to the right place when moving content, deleting pages, changing your URL structure, or even your entire domain name. However, they can also create additional HTTP requests, prolong the browser loading route, and thus, slow down your site. This especially affects mobile users who often have slower connections. As a consequence, any detour affects them even more than their desktop counterparts. Therefore, it’s a good idea to keep redirects to a minimum. To check on your site’s redirection status, you can use the Screaming Frog SEO spider. It’s free for up to 500 URLs. Run a site scan, then check the Status Code column and pick Redirection (3xx) from the drop-down menu.
For single pages, you can also use this tool by Varvy. Evaluate whether all of these redirects make sense and have a purpose. Also check if there are any redirection chains, meaning redirects to pages that redirect to yet another page. Checking for redirects includes scripts, style sheets, or other site resources. These might load from a www address even though your main domain does not have www in front of it, which also requires a redirect. Simplify and eliminate redirects as much as possible. More tips for that here. Of course, sometimes redirects are necessary. In those cases, always make sure to use 301 or 302 redirects as these happen server-side and are cacheable. On the other hand, avoid client-side redirects via HTML or JavaScript as those are significantly slower.
22. Optimize Your Database
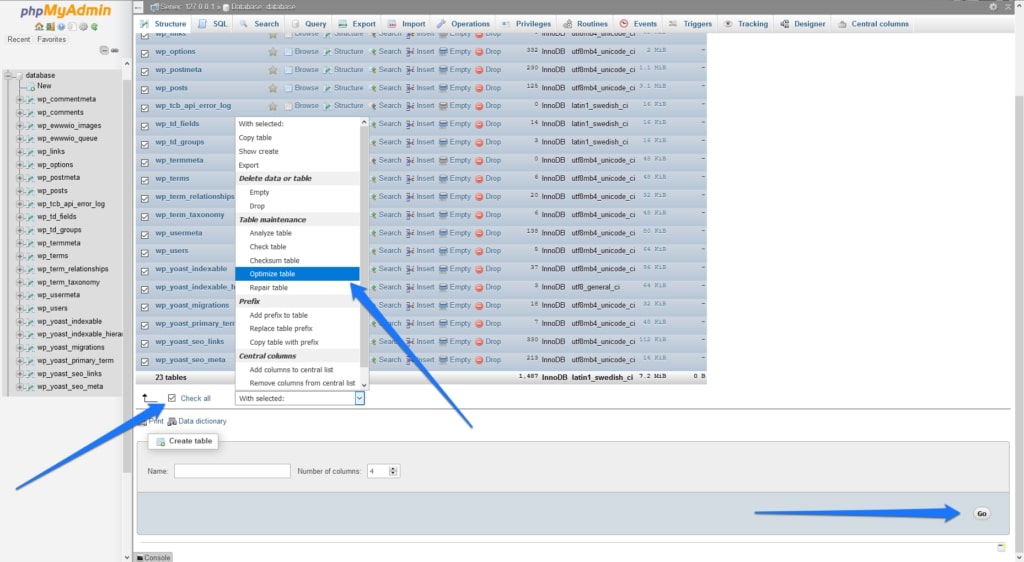
Most of the tips in this guide about making your site’s front end (the part facing visitors) better. However, it’s just as important to look at what you can do in the back end to speed up your website. This is especially true when working with a CMS that uses a database, like WordPress, Joomla, or Drupal. Here, it’s very important that you regularly optimize said database. That means cleaning it of unneeded data (spam comments, etc.) and removing temporary disk space. Doing so makes it leaner and helps it respond faster. This is good since the database contains all content, blog posts, content relationships, etc., and is thus very involved in site-building (see the part about caching above). So, how do you optimize your database to increase site performance? Well, in WordPress, you can use a plugin like WP-Optimize, Advanced Database Cleaner, or Optimize Database after Deleting Revisions to do it for you. Alternatively, it’s also possible to do it manually with a database management program like phpMyAdmin. Hosting providers will frequently provide it to their users for database management. Here, it’s as easy as marking the tables of your database inside the program, picking the Optimize table from the drop-down menu, and hitting Go (don’t forget to back up beforehand).
You also want to follow best practices such as switching off trackbacks and pingbacks, regularly emptying your spam folder and trash, deleting revisions, and other ways to keep the database lean.
23. Regularly Speed Test Your Site
We have already talked about the importance of speed tests. However, they don’t only matter as an initial benchmark but also as an important status indicator over time. As mentioned, a single-speed test is only a snapshot. To find out if there are more systemic server problems (like during traffic surges), you can also use long-term speed monitoring. Services that offer this can also alert you when your site keeps floundering or show you when a particular problem began.

You have several options for that. The aforementioned Pingdom comes as a premium version which also includes page speed monitoring and email alerts. Gtmetrix also offers this for up to three pages on the free plan, more on Pro plans. There is also Uptrends. Plus, don’t forget to check your mobile speed periodically using the tools we mentioned in the beginning!
24. Prioritize and Think Long Term
Learning to speed up your website can seem a bit overwhelming. When you look at a list like above, it seems like a lot. However, as already mentioned in the beginning, you don’t have to do it all at once. Instead, you can do tasks one by one when you have the time. Here, it’s best to prioritize. It makes sense to first do the things that will have a sitewide impact like upgrading your hosting, enabling compression, or setting up lazy loading. To decide where to start, it’s often a good idea to pay attention to the recommendations from speed testing tools, which are usually ordered by severity.
Once done with that, it’s then time to look at individual pages and what makes them slow. Start with your worst-performing pages and work your way up or first attend to the most important pages and work your way down. Either is fine. The important thing is to look at site speed as more of a long-term project rather than a thing that you do once and then never again.
Ready to Speed Up Your Website?
Knowing increase in website speed is an absolutely crucial ability. Site performance is a priority for users and search engines alike and thus essential to your site’s success. You have already taken the first step in speeding up your website by getting educated. You now know why speed matters, what loading speed you should shoot for, how to test your current state and tons of ways how you can make your site faster. Now it’s time for implementation. Pick a few measures to implement start doing so. Once there, check the results and see what else makes sense. Over time, you will greatly improve your site speed and thus its user experience and are well on your way to a better site.
You’re not very tech-savvy and rather focus on your blog or business? No problem! You can always contact FixRunner who is our recommended WordPress support and maintenance provider and they’ll help you out in no time.